September is here and I can already feel the difference in the weather! Last night, I even slept with the windows open because it felt so amazing outside. To some, Fall doesn't start until October hits, but to me, Fall is all year round; the holiday spirit in my heart simply cannot be contained by dates or time. So, to embrace the changing of the seasons, I wanted to create my own festive wallpaper for my desktop so that everyday I can channel the Fall vibes within me.
I have made my own wallpapers before out of my own artwork, but this will be the first time I actually put together a Fall themed one using Pinterest as inspiration. Pinterest is excellent for an activity like this because of how well organized it is and I found that simply using Google alone just didn't give me the results that I wanted. So word of advice, use Pinterest!
I also used Photoshop for this activity just because it allows me to layer all of the photos and edit each one individually if I need to. Even if you're photoshop skills aren't the best-like mine-I only use a few tools within it to help me make this collage; no crazy cropping required! In addition to Photoshop, I use Canva to help add in some small special effects just to make the final results pop a bit more.
The first thing you'll want to do is create a folder on your desktop; this is where you'll put all of your saved Pinterest photos. Searching for photos is the actual fun part as each photo will lift your spirits the more invested you are. You can have as many photos as you like, but try to aim for anywhere around twenty. There were some photos that I thought I would like that I ended up deleting, so it's better to have more than less.
 |
| Starting a new project in Photoshop |
Once inside Photoshop, start a new project and set the canvas size to the size of your desktop. If you don't know how to find this information out, using this tool will help you. Once you have your size set, increase the resolution to at least 300 for better quality. From there, I do two things before actually importing the photos.
I wanted a border around my wallpaper so that I could easily see my desktop icons so I first added a marble wallpaper to my canvas. After that, I used the marquee tool to create a small rectangle in the center of the canvas where I then use the paint bucket tool to color that space in with white - this is where our photos will go.
 |
| Setting up the layout of the canvas |
 |
| Creating a white space for photos to be placed |
We now have two layers available and from there we will now add all of our photos. I didn't really know how to do this at first so I simply just dragged and dropped each photo into the center of the canvas. I did discover later on though that you could simply select multiple photos at once and add them in that way, but at least now I know.
Once your photos are imported, in the layer section, hide all of them except for the first one; we will work on each photo individually to make sure they look their best. If you have a lot of photos, this process will take the longest, but with good music playing and nice photos to play around with, it should be enjoyable; it was for me at least!
 |
| Arranging photos one by one |
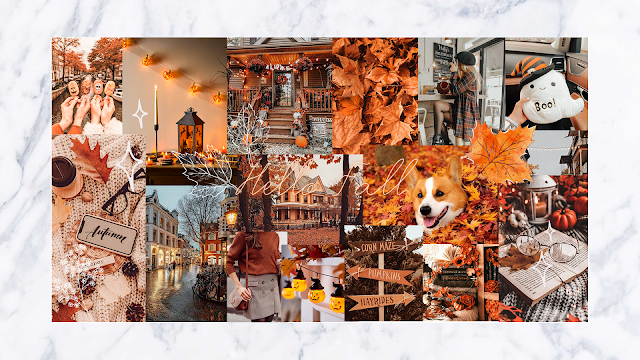
When you're finished, you should have a collage that is glowing with autumn vibes. I had so much fun creating this wallpaper that I even decided to make another one just to show you all how easy it really is to make. Of course, I didn't find myself to enjoy the second one as much as I loved the first one, but I may just edit it some more to spice it up a bit.
 |
| 1st Wallpaper |
 |
| 2nd Wallpaper |
Now, the last thing to do is to make sure if looks great on your desktop. You shouldn't have to make any changes unless the border you made isn't wide enough for your desktop icons; if that's the case, just go back to your photoshop file and make your white space smaller, adjusting the photos along with it.
I hope my fall enthusiasts enjoy this small diy as it's a great daily reminder that our favorite time of the year is literally around the corner. Also, if you want the full experience, you can watch my YouTube video below to get a complete idea of the steps.
Until next time! xoxo - Sarah


0 comments